Color and Light Inspirations in Jewelry – My Creative Journey
Showing posts with label DIY. Show all posts
Monday, May 28, 2012
A SIMPLE EARRING DISPLAY!
I turned a placemat into a display for simple glass earrings... It looks nice! I love repurposing things! :)
Monday, September 19, 2011
CREATIVE CORNER: Wooden Jewelry Display Box
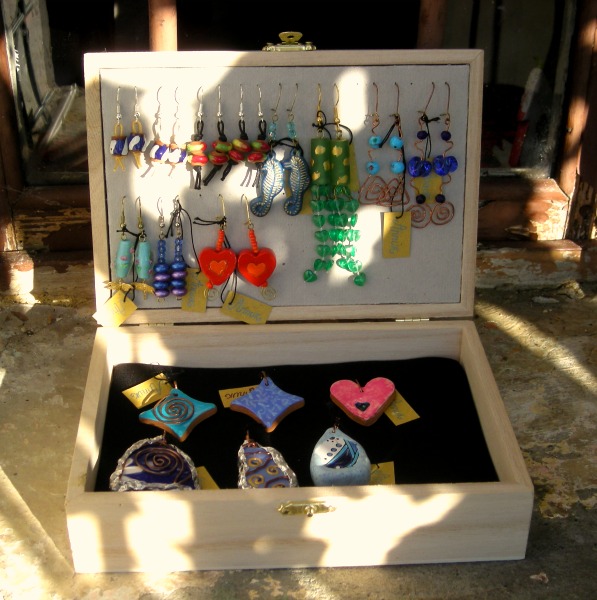
I had bought this beautiful wooden box some time ago, knowing it would make a perfect box for storing and/or displaying my jewelry.
I love making my own jewelry boxes and displays! I mostly make rings and I already have some nice selfmade ring boxes (which even followed me to Rhodes!), but with the Turin Handmade event getting closer, I thought about a solution for my earrings and some of my pendants. First of all I lined the inner base with foam.
Then I covered the foam with black fabric.
For the earrings I found a simple solution: I cut cardboard so as to fit the inside of the lid, making sure to leave some extra surface to bend so as to keep the earring holder lifted from the lid. This takes some "engineering" but it was not so hard, I just measured the inner dimensions of the box carefully.
I pierced the cardboard for the earrings...
And here is my completed jewelry display box! Since all the elements can be taken out, it's still possible to change the "inner life" of the box to fit different occasions!
You can see other Creative Spaces here
Monday, August 1, 2011
POLYMER CLAY MICRO-MOSAIC TESSERAE
If I hadn't written "polymer clay" in my post title, you would probably be thinking these are stained glass tessarae for mosaics! I've come up with this idea after a long time I'd been wanting to make micro-mosaic jewelry! Regular mosaic tiles are too large for small items such as jewelry, and micro-tiles are in ceramic and hard to find, plus they mostly come in pastel colors... As you know, I love strong color contrasts, so stained glass would be perfect, but it's really hard to cut such tiny pieces as I need!
So I thought about polymer clay! I rolled out thin sheets of polymer clay (my fingers were aching after all the mixing, kneading, conditioning and rolling! If you have a pasta-machine you can devote to your polymer clay work, that would make things easier at least with the rolling out in sheets), then after oven-hardening I just cut the sheets with regular scissors, making tiny pieces (again, lots of work!).
I'm very happy with the result and I can't wait to use my self-made micro-tesserae for my new projects!
Tags:
DIY,
mosaic,
polymer clay
Friday, May 6, 2011
CREATIVE CORNER: Ring Boxes
I made two boxes for my rings and they turned out really nice, I'm very happy with them! This is a great way to store and show rings, great for traveling and as displays for fairs, shows etc. The great thing is you don't spend a fortune on them, and they look MUCH nicer and personalized than commercial boxes -- which by the way are usually designed for very small rings, thus not suited for large rings like the ones I make.
The boxes I used were stationery cardboard boxes, but virtually any box would be suited, provided it's deep enough to hold your rings. Apart from this, the only materials you're going to need are some recycled/reclaimed fabric (black or white work best) and foam (I got that for free too).
I followed the suggestions I found online and personalized them my own way... I really liked Popko's tutorial.
Monday, May 2, 2011
Subscribe to:
Posts (Atom)